Squarespace CSS: Adding Custom Fonts
This post may contain affiliate links. If you purchase using one of my links, I may receive a small commission.
Squarespace offers a ton of built in fonts to choose from, and to be fair, you could easily build your brand with what’s offered there.
But maybe you’ve looked through all your options on Squarespace and haven’t quite found that perfect font that matches up with your vision, or with the beautiful typeface that you already found on Creative Market, or maybe already built your brand around.
Not to worry my friend!
In this post, you’ll learn how to add custom web fonts to your Squarepsace website, what file formats you need to use, and how to set up the CSS code so that changing the weight and style later, can all be done using the built in functions of Squarespace, without needing to edit code over and over.
Why Would You Want to Add Custom Fonts to Your Squarespace Website?
Squarespace offers a lot of font options to choose from and you can certainly request a brand designer (like me 😘 — shameless plug) to design with fonts that are already available on the platform.
But, what if you already have a gorgeous brand design using a custom font (like this one), or you have your eye on a specific font that, of course, isn’t available in Squarespace?
Well, you have a few options:
Use a similar font to your brand font on your website. Sometimes it is possible to find something very very similar. Usually though, it isn’t similar enough, and creates inconsistencies in your brand.
Upload Images of your brand typeface. I think we can all agree that this is a terrible idea. Not only is it forking inconvenient, it means that search engines cannot see the keywords you’re using.
Upload your custom brand font to Squarespace and set it to be used for your headings. This option is of course the best. Your brand stays ultra consistent, it’s super duper easy to use once set up (code once and you’re done), and since you’ll be using live text, you know that search engines can see what’s important.
Okay, okay, so clearly uploading your custom font is, 9 times out of 10, the best way to go.
So let’s get started!
Recommended Web Font File Formats
When it comes to file formats there are some preferred options to maximize support across as many browsers as possible.
There are 4 main file types that we will consider:
.TTF + .OTF - TrueType and OpenType font files should be considered if you believe your target user could be visiting your site on an older browser. Adding one of these file formats can help ensure that your custom fonts will load for those using older browsers.
.WOFF - This file type is preferred for use on the web. It is widely supported by today’s web browsers ensuring that your custom font shows up for your site users. It offers greater compression than .TTF or .OTF which means faster loading of your site.
.WOFF2 - This is the newest kid on the block, very similar to .WOFF but offers even greater compression. With so many users accessing websites on mobile devices, this option provides the smallest files and fastest load times.
If you have access to all of these file formats, that’s great. It’s a little extra leg work, but uploading several options will ensure support across as many browsers as possible. If this is the case, upload the .OTF, .WOFF, and .WOFF2. No need to worry about the .TTF file as the support will be the same.
If you don’t have all the formats, don’t sweat it. Most users will likely be using a modern web browser, so uploading the .WOFF (and .WOFF2 if you have it) will be your second best option.
Okay, but let’s say ALL you have is the .TTF or .OTF file?
Don’t fret my friend. There are a couple options.
If you purchased the font from Creative Market or another Type Foundry, reach out to them and ask about the web font files. That is, the .WOFF and .WOFF2 files. You may have to purchase the web font separately if you paid only for the desktop font.
If no web font is available, you can use a site like Font Squirrel to generate the file formats that you need. Bear in mind that you should still possess the correct license to use the fonts on your website.
Now that you have a better understanding of what files you need, let’s get into what you are actually going to do with them!
Adding Your Custom Brand Typography to Your Squarespace Website
Time to get those custom fonts onto your site! Follow these step-by-step instructions to add your custom font files to Squarespace.
Step One: Upload Your Font Files in the Custom CSS Section of Squarespace
1. Navigate to the Custom CSS panel in Squarespace. Design > Custom CSS
2. Scroll to the bottom and click on the button that says “MANAGE CUSTOM FILES.”

3. Next, click on “Add images or fonts.”
4. Locate the font files you want to upload on your computer.
For each font weight or variant you wish to use on your site, you’ll need to upload a separate file.
For example, If you’ll be using the bold weight and the bold italic on your site, you’ll want to upload at least 2 font files, one for each.
If you have the .OTF, .WOFF, and .WOFF2 files, this means that you will be uploading a total of 6 files.


Step Two: Add Your Custom Fonts to Your Squarespace Website
Your files are uploaded but we still need to add them to the backend of your site so we can use them.
1. Copy and paste the following code into the Custom CSS panel:
@font-face {
font-family:font-name;
src: url(font-url.woff2), url(font-url.woff), url(font-url.ttf/.otf);
}
2. For the above code, you’ll now change the text font-name to something that makes sense for your font.
If we look at my example, the first font I’ve uploaded is called Bison, and it is the bold weight. So in the area between the “:” and the “;” symbols I’m going to write Bison Bold. I could also choose to write it as bison-bold.
What’s important to remember, is that however I choose to write the font name here, is how I’ll need to refer to it anytime I want to use it on my site.
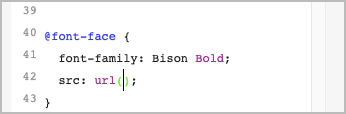
3. Next, you’ll change the font-url.extension
Any unused sections can just be deleted if you did not upload multiple file types.
Delete the example text “font-url.ttf/otf/woff/woff2” and keep your cursor between the parentheses.
Click on “MANAGE CUSTOM FILES,” and then on the font file you’ve uploaded to add the URL of the correct font.
In my example, I’ve only uploaded the .woff file, so I’ve deleted the other URL sections. I’ve done this just to make things a little simpler for the purpose of this tutorial. You’ll still want to upload all three formats if you have them.


Step Three: Assign Your Custom Font to be Used on Your Squarespace Website
Now that you’ve added your custom typeface to your site, there is still one more step you need to take so that you can actually use it.
It would be awesome if it would now show up in the style editor, but alas, it will not. Squarespace may eventually make this so, but for now we have to add a bit more custom CSS in order to use our uploaded fonts.
1. In the custom CSS panel paste the following code:
h1, h2, h3, p {
font-family:font-name;
}
The above code will tell browsers to use your custom font for your heading 1, 2, and 3 (h1, h2, h3 respectively) as well as any body text (p).
Decide which elements on your site you would like to use your custom font for. If for example, you only want heading 1 (h1) to be in your custom font, and all other text in a font that is available in Squarespace, then you will delete everything after h1 and before the { symbol.
2. Next, you will replace font-name with the name of your custom font. Be careful to write it exactly as you have in step two.

3. Save your work.
4. Test your fonts to be sure that your added CSS code is functioning correctly.
You have uploaded the custom font file from your own computer, which means it will most probably work for you, even if you have an error somewhere.
Check that the font shows up properly on a mobile phone or other device.
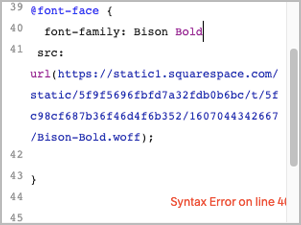
If your font is NOT showing up, ensure that you have typed everything correctly, and that your CSS formatting is correct. If you have a syntax error, Squarespace will let you know which line it is on.
In the example below you can see that Squarespace is telling me I have an error on line 40. This is because I’m missing a closing ; symbol after my font name.
If needed, recopy the code from this post and start again if you cannot find the error.

Yay! You did it! Easy peasy right?
Now, let’s say you want to change the text size or letter spacing, etc. You can still do ALL of this through the built in Style Editor. The only thing that will not show up there is your custom font.
If you don’t want to use your custom font for any of your main headings, you can also add your custom font as an h4, h5, or h6 (heading 4, heading 5, or heading 6). If you are interested in learning how to add these additional styles to your site, I show you how to do that in this post.
How to Set up the CSS Code Once and Use the Built in Functions of Squarespace to Edit the Weight and Style of your Custom Font
Even if you love custom code, going back and forth to the CSS panel is time consuming. It’s better practice to set up all of the font styles once, and be able to take advantage of the built in features of Squarespace to make editing your text easier.
Step One
For this to work, you’ll need to upload at least 4 font files. For this tutorial, I’ve uploaded the following fonts from the Bison typeface family:
Bison-Regular.woff
Bison-RegularItalic.woff
Bison-Bold.woff
Bison-BoldItalic.woff
Upload at least 4 font files, one non-bold weight, one bold weight, and both italic versions of the first two.

Step Two
Add the @font-face CSS code for each font style using the previous set of instructions (Step Two).

Step Three
1. Copy and paste the following code into the CSS editor:
h1 {
font-family:font-name;
}
h1 em {
font-family:font-name;
}
h1 strong {
font-family:font-name;
}
h1 strong em {
font-family:font-name;
}
Em stands for Italic
Strong stands for Bold
2. Replace font-name with the correct font style name that you’ve given each one in your @font-face declarations.
So for my example with the Bison typeface it looks like this:
h1 {
font-family:Bison;
}
h1 em {
font-family:Bison Italic;
}
h1 strong {
font-family:Bison Bold;
}
h1 strong em {
font-family:Bison Bold Italic;
}

And that’s all there is to it!
Now you can use the built-in on-page text editor in Squarespace to make your custom font heading bold and/or italic.

Check out more custom fonts on Creative Market that can help make your brand unique!
Don’t take off without snagging a copy of my Free Website Goals + Nav Workbook. This workbook will help you set clear goals for your website and navigation that will help you convert your site’s users into paying customers and clients!


